Panzer iv build progresses on many fronts - Weeks #24 - 25 - 26
- panzerfabrik
- May 7, 2020
- 5 min read

This blog entry will simply throw a bunch of progress steps that have been accomplished in the last several weeks. There is a lot of juggling and several areas are progressing simultaneously.
Aufbau Internal Bracing
After the shell of the Aufbau was constructed we had to go inside and add some bracing features. These are very specific bracing pieces and I don't understand why they are the way they are. It's not our job to "improve". Its our job to duplicate exactly. So copy and install them... we did. This work was done before the hot rivets covered in the last post.


The dimensions of these braces and their locations were taken from the flakpanzer restoration in Canada. These braces are consistent with every (ausf. G, H, J) original Panzer IV that I have seen. There must be a reason why they are the way they are but without further clues it's hard to say.
Aufbau face plate
This piece was a project unto itself as you may imagine.


But it's awesome and we love it so ! 80mm thick Brutal. The drivers visor and MG34 ball gun assemblies have been fitted and they go in nicely. "after a little fine tuning"
Front section of Aufbau roof
Finally we get to put on the front of the roof.


Once again, it fit like a glove... Actually that's not completely true. We had to trim it to length to set up a nice trough for the weld joint to the Aufbau face. The "like a glove" refers to the width, angles and the breakpoint of the angles. There could have been a lot of ways for this to go wrong.
Brake Hatch Handle assemblies
These handle assemblies have been coming along for awhile but they are finally done, installed and adjusted to work perfectly. Original Brake hatches are fairly common in the used panzer part world. They apparently blew off cleanly and flew a long distance whenever a Panzer IV was destroyed. The importance of the "flew a long distance" is that it made the post war scrap collectors miss finding them. But, almost all of them have destroyed or missing latches.


They have a detent type setting for "open" and "closed". A ball bearing, spring and three pockets on the hatch will position the handle where it needs to be to be open or closed.
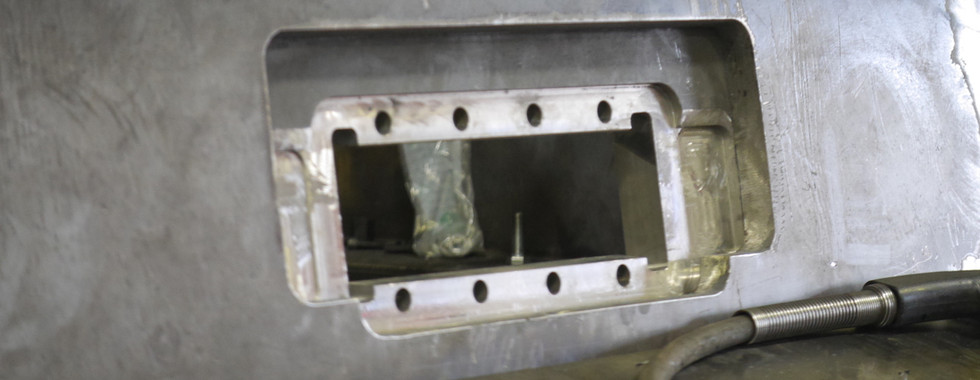
Cooling air vent
This is the outlet for brake and clutch cooling air. Air is drawn in from the scoops on the nose, across the steering brakes, through the clutch and out this protected hole.


Kind of a Panzer IV thing. Its one of those iconic identifiers that one sees when looking at a Panzer IV. The square hole gets sheet metal added with a round hole cutout for the pipe carrying the hot air.
Aufbau front lifting hooks
Drill a hole. Chamfer the hole. Make a special tapered stud. Install hook with 16mm castle nuts. Easy


Transmission
Before putting the roof on we did a little work on the transmission situation.


Behold the Transmission... The goofy disks on the output is a coupler made to be flexible and soak up vibration. This Tranny will bolt directly to the FV432 Steering gear box so something has to absorb the chaos that will happen between the two gearboxes. This product is developed to be used in big boats to connect the propeller shaft. It takes up the vibration and keeps the transmission from disintegrating internally. Kinda cool huh?
Unfortunately we couldn't fit the transmission, while maintaining the axis of the drive shaft, without modifying the stock panzer IV floor bracing. Had to make room... no way around it. But Michael did a great job and the modification isn't offensive to the eye.
With the transmission in place you can see the tight space we have to work with. You can also see the twin disk clutch nestled into the transmission's bellhousing. The clutch activation fork is all contained in the bellhousing also.
Now all I have to do is design and construct the other half of a bellhousing, a carrier bearing housing and a faux crankshaft to attach to the clutch/flywheel.
Stick Welding with Chrome/Nickel Rods
Stick welding requires a lot more skill than wire feed (MIG) welding. Stainless is a little tricky on top of that. But WWII German armor was welded with Chrome-Nickel via stick. Wire feed welds can come close to looking like stick welds but even when great care is taken to simulate stick, it looks ever so slightly different. We are not accomplished stick welders. So we gotta learn fast.


Fortunately, the original assemblers of later Panzer IVs weren't very good either. The level of weld quality on original later Panzer IVs could be described as functional but not beautiful. Here are examples of the originals we are patterning. Compare our finished product with the original. of course ours is missing paint. When ours is painted the coating will smooth some of the surface of our welds. It should be an exact match. I am happy because my eye perceives an equal "look and feel".


Track Link Preparation
We have a lot of track. It was recast in the early 2000(nds). It has a precisely tight track pin fit that has frozen the pieces together. The track is package in three pad sections. So that means to get things loosened up we have to drive out 2 pins per section. It's a lot of work.


If you look closely you will see that Eddy is in a zen state and "one" with the link.
It is a late war style of link evidenced by the solid guide that has the u shaped impression. The hollow guide style would be a better match for this panzer but this track will be absolutely perfect for our original last production J.
Track Pins
So this leaves us with about 700 track pins (three sets +). Rather than putting them back in, we have decided to make new pins that are .030 smaller in diameter. Then there won't be a chance that they will make friction or resistance in the future.


It's simple.... Cut the rod, cut a thick washer out of DOM tubing, weld the washer to the rod, drill a retention hole and chamfer the other end. Now do that... over and over and over and...
DOES ANYONE NEED TO BUY SOME TRACK PINS? They will fit standard WWII German track and are unused. The pins are exactly 20mm O.D.
Next week we will be taking on the motor cover section. Again, in true Panzer IV style, it is made up of 6,847 individual pieces, welded, bolted, riveted to assemblies, glued to fixtures and braces, hung from components that are interlaced with sub-particals, adjacent to angle iron and "C" channel reinforcements. It will be easy !
Until then...
Randy
Panzerfabrik


Comments