Panzer IV Build, "Merry Christmas and Happy New Year" ... Weeks #57 to #62
- panzerfabrik
- Jun 24, 2021
- 3 min read

This entry catches up the build to the New Year 2021. So a cold wintery photo of a Panzer IV seems appropriate.
In December we furthered the focus on mechanical items. It became time to solve the clutch pedal and linkage. After the steering and Driver's seat were in we could firmly develop the path for the linkage to operate the clutch. Again with a series of rods, shafts and bell cranks we routed the connection. Also, we had to come up with a clutch pedal and mount.
We had some tight tolerances to work with. There will be a shielded drive shaft connecting the output of the differential and the input of the final drive. (future nightmare to be sure) That will cut right across the driver's shin bone area. The pedal requires some movement, or swing, so its very tight on the driver's feet. Everything will need to be EXACTLY where it needs to be.
So away we go into invention land.
This is a fantasy assembly. In other words,,, Nothing like a Panzer IV. This is conceived and built strictly to perform a function. It doesn't mimic a Panzer IV design very close at all. No art here. Purely function.
The result... Giving a pretty good idea of the driver's environment. Seat, steering tillers, clutch and gas pedal. The gas pedal conforms to the original Panzer IV look and layout.

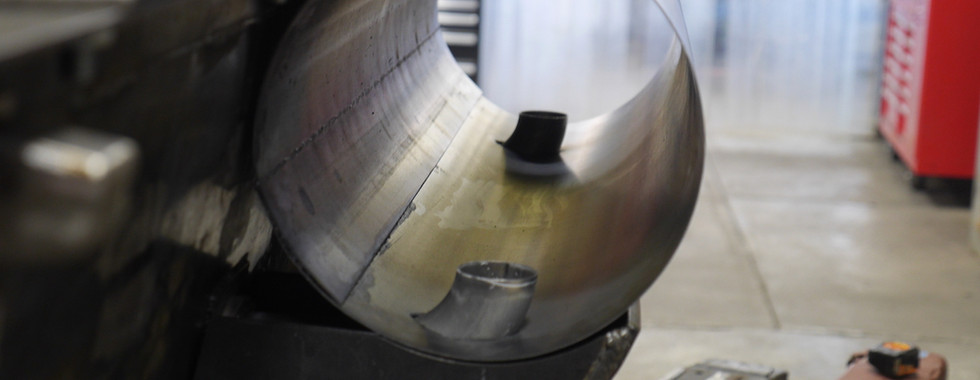
Now on to the Muffler. This was a really fun fabrication. I took a lot of care to exactly conform to the diameter, length and construction detail of an original piece. On restorations since WWII it seems to me that this is a common item that the restorers mess up. Too long,,, too big,,, too small,,,, too short,,, goofy layout, etc... The earlier Panzer IVs had a really long muffler and sometimes this muffler is seen on later versions of the Panzer IV. Other than that they seem to be pretty consistent in specification. (exception being minor variations in the output tube)
Here it is... PERFECTION! (as the Panzer IV experts mutter: "yeah,,, whatever!")

I tried to find a cylinder or tank that matched the diameter and length. No match. Some were pretty close but didn't match exactly. So we had to start from scratch rolling a piece of 14 gauge and go from there.
Then we moved on to the baffles. After looking at a lot of successful designs we finally decided on our configuration that will hopefully cut out the high sound frequencies and leave the lower base tones while not restricting air flow. Mufflers work by bouncing sound waves back into themselves. A series of reflective barriers are set to bounce the waves into a mush where they cancel themselves out. We don't have any way to get more precise so its a guess at what distances and arrangement to undertake to best accomplish this.
Fortunately, I found a tank that had the right shaped convex end caps. So we cut off the ends and trimmed the diameter. This tank was a near miss but it was about 1 inch too big in diameter and 2 inches short. So we pirated the end caps and trimmed.
I have original pieces that bare the holes for the mounting straps so we could zero in on the exact placement of the straps. Real complicated - high tech stuff. Bolt up the straps and stitch it to the body of the muffler.
As if you can't tell... we're super happy with the outcome. Panzer IV muffler - Baby!
Being this close to having a complete motor cover compartment Kevin did some mill work to make the hinges for the doors on top that access the motor. I have original hinges but am saving them for the original ausf. J restoration in our future. So we used them to copy the hinges for this ausf. H
These are roughed in with the mill and we will hand grind to touch them up and smooth out the edges a little.
So 2020 (The worst year ever) ends. Good riddance. EXCEPT... It has afforded us the chance to dedicate ourselves to this build. All the other clutter (and fun) went on hold. Its been a simple life. Get up... go build panzer... go home... watch the United States unravel on TV. Go to bed. Maybe that wasn't so bad. --- In its own weird way.
Randy
Panzerfabrik


